AgroHack
A hands on workshop for an agrotech hackathon 🌽
Trigger an Azure IoT Central command if the soil moisture is too low
In the previous step you created an Azure Function triggered by Azure Stream Analytics to check soil moisture. In this step you will add to this function to trigger the Azure IoT Central command with a value depending on the level of the soil moisture, turning the LED off if the soil is wet, and on if it is dry.
Execute Azure IoT Central commands
Commands created on an interface on a device template can be executed by making REST requests against the Azure IoT Central app. These requests can pass values to the command.
The REST request is made against your IoT Central app, for a specific device, interface and command, passing in data as a JSON object. The request is authorized using an API key.
Get the API key
API keys are created in Azure IoT Central and can have different permissions, including the ability to administrate the entire application. These are strings that are passed in the headers of a REST request.
-
Open the app in Azure IoT Central
-
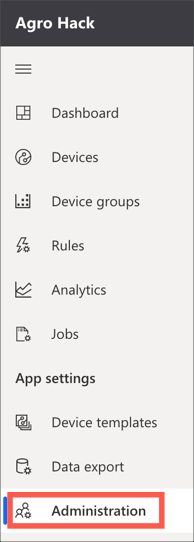
Select Administration from the left-hand menu
-
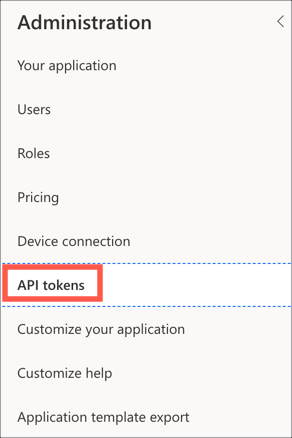
Select API tokens from the Admistration menu
-
Select + Generate token

-
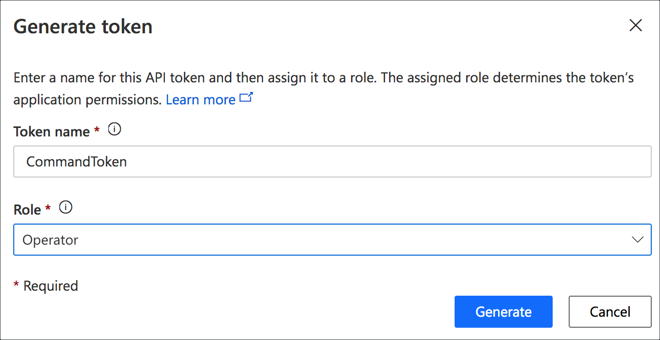
Fill in the token details
-
Give the token a name, such as
CommandToken -
Set the Role to
Operator. This is the lowest level of access and allows commands to be called, but no changes to be made to the app -
Select Generate
-
-
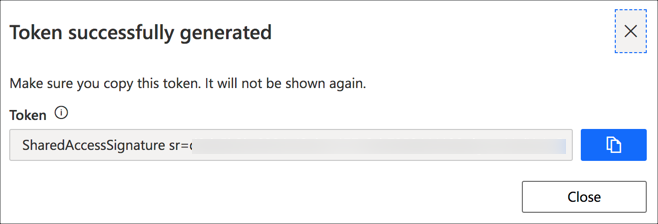
The token will be generated and shown. Take a note of this token as once this dialog is dismissed it is impossible to retrieve the token again. If you need the value you will have to delete the token and create a new one.
Build the REST request
The URL for the REST request to execute a command is in the following format:
https://{app_name}.azureiotcentral.com/api/preview/devices/{device_id}/components/{interface_name}/commands/{command_name}
-
{app_name}is the URL of the Azure IoT Central app, the part before.azureiotcentral.comon the URL when loading the app in your browser -
{device_id}is the ID of the device, for this workshop the device id israspberry_pi -
{interface_name}is the name of the interface -
{command_name}is the name of the command, for this workshop the command is namedneeds_watering
In this workshop, the device id is hard coded to the Raspberry Pi. In a real world scenario you would have multiple devices, so the device id would need to be added to the telemetry so that the function can be run for and control multiple devices
Get the interface Id
-
Select Device templates from the left-hand menu in your Azure IoT Central app
-
Select the Environment Sensor device template
-
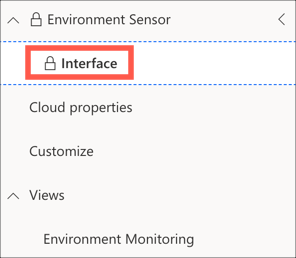
Select Interface from the Environment Sensor menu
-
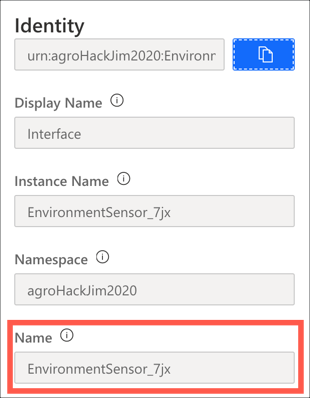
Select the View identity button

-
Copy the value of the Name field
-
Create the REST URL by replacing the
{app_name}and{interface_name}in the following string:https://{app_name}.azureiotcentral.com/api/preview/devices/raspberry_pi/components/{interface_name}/commands/needs_watering
Test the REST API
To test the REST API you will need a tool like Postman. You can install Postman from the Postman.com.
-
Set the request type to
POST -
Set the URL to the one you just generated

-
In the Headers section add a new header.
-
Set the Key to
Authorization -
Set the Value to the API token you created earlier

-
-
In the Body section add JSON to set the request value
-
Set the body type to
raw -
Set the raw type to
JSON -
Set the body to the following
{
    "request": true
}
A request value of
trueshould turn the LED on, a value offalsewill turn it off

-
-
Select Send
-
The command will be executed with the request value, and Postman will show a success status, usually 201. You will also see the LED turn on or off. Change the
requestvalue to see the LED toggle on and off.
Execute the command from an Azure Function
Depending on the soil moisture levels sent by Azure Stream Analytics to the function, the LED should be turned on or off. Based off the Grove capacitive soil moisture sensor, an average soil moisture value of less than 500 would be considered dry and in need of watering.
Add code to extract telemetry to the Azure Function
-
Open the Azure Function app in Visual Studio Code
-
Open the
__init__.pyfile from theSoilMoistureCheckfolder if it’s not already open -
Change the
mainfunction to the following:def main(req: func.HttpRequest) -> func.HttpResponse: # Log the function was called logging.info('Python HTTP trigger function processed a request.') # Get the JSON from the request req_body = req.get_json() # Log the JSON logging.info(req_body) # The JSON can contain a single telemetry record or a list # If it's a list, get the last item if isinstance(req_body, list): req_body = req_body[-1] # Get the telemetry values temperature = req_body['temperature'] pressure = req_body['pressure'] humidity = req_body['humidity'] soil_moisture = req_body['soil_moisture'] # Log the values logging.info("temperature: %.1f, pressure: %.1f, pressure: %.1f, soil_moisture: %.1f", temperature, pressure, humidity, soil_moisture) # Return a 200 status return func.HttpResponse(f"OK")This code extracts the body of the request as a JSON document. This can be a list of telemetry documents, or a single document, so if it’s a list it gets the last entry. It then extracts the values for temperature, pressure, humidity and soil moisture and logs them.
Add the moisture check to the Azure function
-
Add the following code above the
mainfunctiondef needs_watering(soil_moisture): return soil_moisture < 500This function just checks the soil moisture value against a threshold of 500. In a later part you will add logic to check weather, and only flag that the plant needs watering if the soil is dry and rain is not forecast.
-
Call the new
needs_wateringmethod at the end of themainfunction and put the value into a dictionary ready to send to the REST API as JSON. Add the following code at the end of themainfunction before thereturnstatement.def main(req: func.HttpRequest) -> func.HttpResponse: ... # Check if the plant needs watering request = { 'request' : needs_watering(soil_moisture) } # Return a 200 status return func.HttpResponse(f"OK") -
Save the file if necessary
Call the REST API
Add the requests package
To make REST requests in Python, you can use the Pip package requests. This contains a low barrier to entry API for making REST calls.
-
Open the
requirements.txtfile from the root of the function app in Visual Studio Code -
Add the following line to the end of the file
requests -
Save the file if necessary
There is no need to install this package as it will be done automatically for you when you run the function app in the debugger
Set an environment variable for the API token
Setting values such as API tokens is code is bad practice. It makes it hard to change these values and too easy to put them somewhere like source code control where they can be stolen. It is better to put them in configuration files and load them on demand.
When running locally, Azure Functions uses a local file for configuration called local.settings.json with the values being made available as environment variables. When running in Azure, these values can be set in the Application Settings and accessed the same way.
-
Open the
local.settings.jsonfile from the root of the function app in Visual Studio Code -
Add and entry inside the
valuesnode for the API token calledIOT_CENTRAL_API_TOKEN{ "IsEncrypted": false, "Values": { "AzureWebJobsStorage": "", "FUNCTIONS_WORKER_RUNTIME": "python", "IOT_CENTRAL_API_TOKEN": "<Api_token>" } }Set the value of
<Api_token>to be the API token created in the Azure IoT Central app earlier -
Open the
__init__.pyfile from theSoilMoistureCheckfolder in Visual Studio Code -
Add the following code to the top of the file to import the
osmoduleimport os -
Below the imports, declare a field for the API key reading the value from the
IOT_CENTRAL_API_TOKENenvironment variable# Get the environment variables iot_central_api_token = os.environ['IOT_CENTRAL_API_TOKEN']
Make the call to the REST API
-
Add the following code to the top of the file to import the
requestsmoduleimport requests -
In the
mainmethod after the call toneeds_watering, add the following code to define the URL, the headers and the JSON body of the REST calldef main(req: func.HttpRequest) -> func.HttpResponse: ... # Check if the plant needs watering request = { 'request' : needs_watering(soil_moisture) } # Call the REST API url = '<rest_url>' headers = {'Authorization': iot_central_api_token} # Return a 200 status return func.HttpResponse(f"OK")Set
<rest_url>to be the URL of the command that you used in Postman in the last step -
Add a call to the
requestsmodule to make the REST call passing in the headers and jsondef main(req: func.HttpRequest) -> func.HttpResponse: ... # Check if the plant needs watering request = { 'request' : needs_watering(soil_moisture) } # Call the REST API url = '<rest_url>' headers = {'Authorization': iot_central_api_token} requests.post(url, headers=headers, json = request) # Return a 200 status return func.HttpResponse(f"OK") -
Save the file if necessary
Test the function
-
Run the function using either Visual Studio Code, or from the Azure CLI by following the instructions from an earlier step. Instead of calling the function from a browser, test it from Postman so you can pass the same JSON packet to the function that would be passed from Stream Analytics
-
In Postman, set the URL to be
http://localhost:7071/api/SoilMoistureCheck, the URL of the local function running in the debugger -
In the Body section add JSON to set the telemetry values
-
Set the body type to
raw -
Set the raw type to
JSON -
Set the body to the following
{
  "temperature": 25,
  "pressure": 100,
  "humidity": 75,
  "soil_moisture": 1000
}
Values of
soil_moistureof 500 or more will turn the LED off, less will turn it on.
-
-
Select Send
-
You will see the function being called in the debug output, and by changing the value of
soil_moisturein the JSON you will be able to turn the LED on and off.
Deploy the Azure Function
The function can be deployed using Visual Studio Code or the Azure CLI.
Deploy the function using Visual Studio Code
As well as deploying the function, the API Key also needs to be deployed from the local.settings.json file into the Application Settings in Azure.
-
From Visual Studio Code, launch the command palette
- On macOS, press command+shift+p
- On Windows or Linux, press ctrl+shift+p
-
Search for
Azure Functions: Upload Local Settingsand select it
-
Select your subscription and the Azure Functions app you deployed to
-
The settings will be uploaded, and you will see the settings being uploaded in the Output window

-
Launch the command palette
-
Search for
Azure Functions: Deploy to Function Appand select it
-
Select your subscription and the Azure Functions app you deployed to
-
You will be prompted to confirm the deploy, overwriting the existing app. Select Deploy.

Deploy the function using the Azure CLI
-
Deploy your function to this app with the following command
func azure functionapp publish <function_app_name> --build remote --publish-local-settings --overwrite-settingsFor
<function_app_name>use the name you used when creating the Function App.The
--publish-local-settingsoption will push settings from thelocal.settings.jsonfile into the Application Settings in Azure.When the settings are published, if the values will overwrite an existing setting, you will be asked to confirm if this is what you want to do. The
--overwrite-settingssetting tells the call to always overwrite, and not ask.
Test the function app
Every 5 minutes the stream analytics job will average the soil moisture and send it to the function app. If the value is less than 500 the LED will light up, otherwise it will turn off.
-
Put the soil sensor in some dry soil, with a moisture value less than 500. You can check this value on the Azure IoT Central app device view. After 5 minutes the LED will turn on.
-
Put the soil sensor in wet soil, or water the plant. After 5 minutes the LED will turn off.
To make testing faster, you can update the stream analytics job query to use a smaller time window
In this step you added to the function to trigger the Azure IoT Central command with a value depending on the level of the soil moisture, turning the LED off if the soil is wet, and on if it is dry. In the next step you will call Azure Maps to check the weather forecast before sending the needs watering command.